A reusable water bottle is easy to trust because it looks simple. Fill it, carry it, sip from it, refill it, and repeat. The problem is that a bottle also spends long hours warm, damp, closed, handled, and sometimes forgotten in a bag, car, gym locker, desk drawer, or bedside corner.
That does not mean reusable bottles are unsafe by default. It means they need the same ordinary cleaning attention as cups, lunch containers, straws, travel mugs, and food storage lids. A quick rinse may remove yesterday’s water, but it does not always clean the mouthpiece, cap threads, straw, gasket, or bottom seam where moisture lingers.
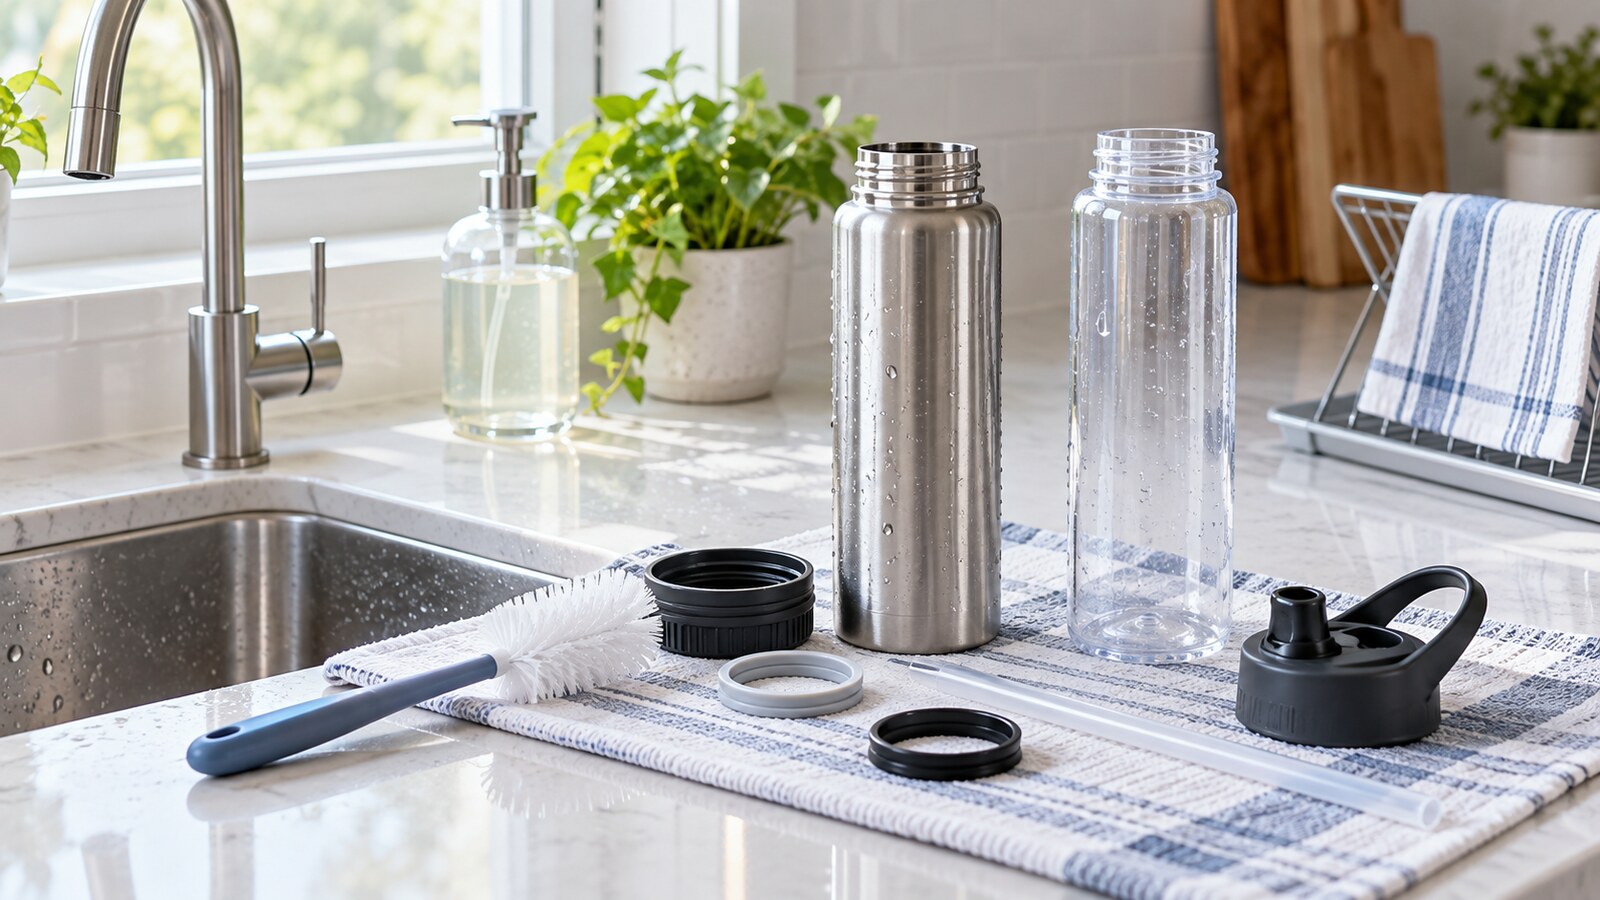
The best routine is simple: take the bottle apart, wash every piece, rinse well, and let it dry fully before reassembling.
Quick Answer
Clean a reusable water bottle daily if you use it throughout the day, and after every use if it held anything other than plain water. Take apart the lid, straw, mouthpiece, gasket, and bottle body. Wash dishwasher-safe parts on the recommended rack or scrub by hand with hot water, dish soap, and a clean bottle brush. Rinse thoroughly, then air-dry every part completely before closing the bottle. Sanitize occasionally when the bottle has been neglected, smells musty, was used while sick, or held sugary drinks, but always check the manufacturer’s instructions first.
Start by Taking the Bottle Apart
Most bottle cleaning problems begin with a bottle that is washed as one piece.
Unscrew the cap. Remove the straw if there is one. Open the spout, slider, bite valve, silicone ring, gasket, carry loop, or removable mouthpiece. If the manufacturer says a seal can be removed, take it out gently and remember how it fits before washing.
Those small parts matter because they are the places your mouth touches most often and the places where water can sit after the bottle looks clean from the outside. A bottle with a flip-top lid, sports nozzle, straw, or insulated coffee-style cap usually needs more attention than a plain wide-mouth bottle.
If the bottle has parts you cannot remove, open every moving piece and wash from several angles. Do not force parts apart if the design does not support it. A cracked mouthpiece or stretched gasket can make the bottle leak, trap grime, or become harder to clean later.
Wash Daily When the Bottle Is in Daily Use
If you refill the same bottle all day, build washing into the end of the day. That is easier than trying to remember whether the bottle was rinsed yesterday, last weekend, or before the last workout.
For hand washing:
- Empty the bottle completely.
- Rinse the bottle and parts under running water.
- Add dish soap and hot water.
- Scrub the inside with a bottle brush that reaches the bottom.
- Use a smaller brush for straws, spouts, cap threads, and gasket grooves.
- Rinse until no soap remains.
- Place every part where air can reach it.
Do not forget the outside. The cap, carry handle, bottom edge, and body of the bottle touch desks, bags, gym floors, car cup holders, kitchen counters, and hands. Wash those surfaces too, especially after travel, workouts, commutes, shared spaces, or illness.
If the bottle is dishwasher-safe, follow the label or manufacturer’s instructions. Many bottles and lids can handle the dishwasher, but some insulated bottles, printed finishes, plastic parts, seals, or coated pieces may not. Put small items in a covered basket or mesh dishwasher bag so they do not fall into the filter or heating area.
Pay Extra Attention to Lids, Straws, and Gaskets
The bottle body is usually the easiest part to clean. The lid is where the quiet work is.
Straws need a thin brush that passes through the full length. Run soapy water through the straw, scrub the inside, rinse, and hold it up to the light if the material is clear enough to inspect. If a straw remains cloudy, slimy, cracked, or sour-smelling after cleaning, replace it if the brand sells replacement parts.
Mouthpieces and bite valves should be opened while washing so water reaches the surfaces that touch your mouth. Gaskets need special attention because they sit inside grooves. If you remove one, wash the ring and the groove, rinse both, and let them dry before putting the seal back.
Do not share bottles casually, especially bottles with bite valves, straws, or hard-to-clean mouthpieces. If someone else uses the bottle, wash it fully before using it again.
Dry It Before You Close It
Drying is not a finishing detail. It is part of the cleaning process.
After washing, place the bottle body upside down or at an angle so water can drain. Spread out the lid, straw, gasket, and small parts on a clean paper towel, clean unused dish towel, or clean drying area. Let air reach every side. Do not rub the inside dry with a used kitchen towel, because that can transfer new residue or germs back to the clean surface.
Reassemble the bottle only after the parts are completely dry. Closing a damp bottle traps moisture, which is exactly what creates that musty smell people often notice later. If you need to pack the bottle before it has dried, leave the cap loose and finish drying it as soon as practical.
This drying habit overlaps with other home-maintenance routines. GDU’s guide to keeping indoor humidity under control explains the same basic principle at room scale: moisture that cannot escape is easier to ignore than to fix.
Handle Odors Without Guesswork
A bottle that smells off is asking for a reset. Start with a normal wash, but slow down around the parts that usually get missed: cap threads, straw, mouthpiece, gasket, and bottom corners.
For mild odors, a baking-soda paste or soak can help. Mix baking soda with water, scrub the inside, let it sit briefly, then rinse well and wash with soap again. This is especially useful for bottles that held coffee, flavored drinks, protein shakes, smoothies, or electrolyte mixes.
For stubborn odors, check whether the manufacturer recommends a sanitizing method. Some materials tolerate diluted unscented household bleach, boiling, steam, or dishwasher sanitizing cycles; others do not. Do not mix bleach with vinegar, ammonia, dish soap, or other cleaners. Use only one method at a time, follow product directions, and rinse or air-dry as instructed.
If a bottle still smells musty after careful cleaning and drying, inspect it under good light. Scratches, rough areas, cracked seals, cloudy straws, and residue inside the lid can all make cleaning harder. A bottle can be environmentally friendly and still reach the end of its useful life.
Clean More Often After Certain Uses
Plain water is the easiest case. Other drinks need quicker washing.
Wash the bottle promptly after:
- Sports drinks, juice, sweet tea, flavored water, soda, milk, protein shakes, smoothies, or coffee.
- A workout, hike, hot commute, beach day, or long car ride.
- The bottle was left in heat or direct sun.
- The bottle was used while you were sick.
- The bottle was shared.
- The cap fell on the floor or into a bag with shoes, gym gear, or food.
- The bottle sat with liquid inside for more than a day.
Sugary and milky drinks leave residue that plain water does not. Heat can make smells stronger. A closed bottle in a warm car or gym bag should not be treated like a clean glass on the kitchen shelf.
If hydration is the reason you carry the bottle, keep the habit simple. For most people, plain water is enough for ordinary hydration, while exercise, heat, and heavy sweating may call for more individual judgment. A clean bottle makes that basic habit easier to repeat.
Store It Open, Dry, and Ready
Once the bottle is clean and dry, store it in a clean place with the cap off or loosely set on top. That allows any remaining moisture to escape and keeps the inside from becoming stale between uses.
Avoid storing clean bottles in damp cabinets, gym bags, car trunks, bathroom counters, or near cleaning chemicals. If you keep several bottles, rotate them so none sits closed and slightly damp for weeks.
Before filling a bottle that has been stored for a while, give it a quick smell check and rinse. If it was stored fully dry in a clean cabinet, that may be enough. If it smells stale or has visible dust, wash it again.
Know When to Replace the Bottle
Cleaning can do a lot, but it cannot fix every bottle.
Replace a bottle, lid, straw, or gasket when:
- The inside is scratched, rough, or hard to rinse clean.
- The lid has cracks, warped parts, or trapped residue.
- The straw is cloudy, split, or permanently discolored.
- The gasket is stretched, sticky, torn, or missing.
- Odor returns immediately after washing and drying.
- The bottle leaks after careful reassembly.
- The manufacturer says the part is no longer safe for its intended use.
Plastic bottles can become scratched over time. Metal bottles can dent, especially around the rim. Clear bottles may cloud. Lids are often the first part to fail because they combine moving parts, seals, mouth contact, and daily handling. Replacing a lid or straw can extend the life of the bottle without replacing the whole item.
Common Mistakes
The first mistake is rinsing instead of washing. A rinse can remove loose residue, but it does not replace soap, scrubbing, rinsing, and drying.
The second is ignoring the lid. If the bottle body is spotless but the spout and gasket are neglected, the bottle is not really clean.
The third is closing it while damp. A clean bottle that is sealed wet can smell stale by morning.
The fourth is assuming every bottle belongs in the dishwasher. Check the care instructions, especially for insulated bottles, decorated finishes, soft plastics, and replacement lids.
The fifth is using harsh cleaning shortcuts without checking compatibility. Strong chemicals, abrasive pads, and boiling water can damage some materials.
Bottom Line
A reusable water bottle should make hydration easier, not mysterious. The routine is small: take it apart, wash the pieces, scrub the places your mouth touches, rinse well, and let everything dry before reassembling.
Once that becomes automatic, the bottle is ready for ordinary life: work, school, travel, exercise, errands, and the desk beside you. Clean gear lowers the friction of a healthy habit, which is exactly what reusable bottles are supposed to do.